
Hi, Apple Fan Folk!!!
I wanted to start by letting you all know that I am NOT a graphics person. All those cute little graphics that you Shanice gives you with tutorials, you will not be getting with me! (LOL) Anyway, today, I am going to be teaching you how to do very basic theming. I taught myself by trial and error so, if you mess up any of these steps, I have probably done it also, 20 times over. I am Mac user, so I am going to show you how I SSH using Fugu, but the process is exactly the same on WinSCP. The default login and password are root and alpine, for Fugu, also.
For this process you will need:
- A jailbroken iPhone that is SSH capable. For instructions on how to SSH, click here.
- An SSH program such as WinSCP (for PC) or Fugu (for Mac). The link to download WinSCP is on the SSH tutorial, linked above, and you can download Fugu here.
- PhotoShop, Paint.net or another photo editing software.
- Is that it?? I think that's it.
- Wait, no that isn't it. You will need a wallpaper in PNG format, a dock that either is sized correctly or that can be resized, and the icons of choice.
1. Connect your phone with your SSH software of choice. Your computer's information will be on the left and your phone's information will be on the right.
your phone with your SSH software of choice. Your computer's information will be on the left and your phone's information will be on the right.2. Choose the menus, on the right, as follows: var> stash> themes. This is where you will find all the theme files that are on your phone.
3. Hit the New Folder icon, at the top of the page, and create a new folder with the name "Test Theme". The theme can be renamed later but, for the purposes of making it distinctive and limiting it to this theme tutorial experience, we are going to name it "Test Theme". This will be the only folder you create where the name won't matter, in order for your theme to work correctly. If this folder is not in the theme section, it will not work.
4. Click to open your new folder and, inside, you will place two more folders. One you will name "Bundles" and the other you will name "Icons".
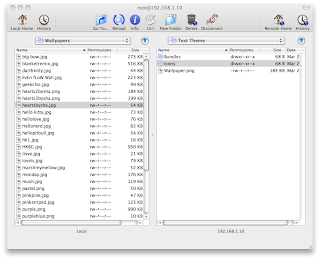
5. While you are in this area of your file, you will place your wallpaper into your theme. **Wallpaper is optional. If you just want to change your icons,or dock, and have the option to change your wallpaper, from your phone, without having to SSH and alter the file, you can skip the wallpaper.** Your wallpaper must be a PNG file and PNG must be in lowercase letters. If it isn't, it will not work. Locate your wallpaper file, on the left, and drag it into your "Test Theme" folder, on the right. Rename the wallpaper "Wallpaper.png". (Special thanks to Shanice for the wallpaper I'm using!) That is all that will be put in this section. When you've done it correctly, it will look like it does in the photo, on the right.
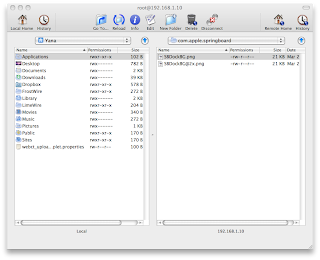
6. Click into your "Bundles" folder and add a new folder, inside of it. This folder will be called "com.apple.springboard". Click into that folder and that is where you will place your dock image. I took a dock that was sized for Android (Special thanks to Lauren for making the dock I used.) and I resized it. This is what you will need PhotoShop or Paint for. The proper dimensions for the iPhone 4 dock are 640 x 80. Once you have it sized correctly, find the dock's file on your left and move it to the right. You're going to have to put it in twice; rename the first one "SBDockBG" and the second one "SBDockBG@2x". The same exact file should be placed twice and named two different things. If this is not done correctly, it will not work. That is all that will go in this section.
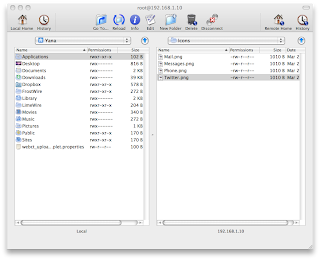
7. Move back into the "Test Theme" folder and select your "Icons" folder, from there. This is where your icons will go. Find the icons on your left and drag them over to your right. Like all the other files, you will have to rename them. Name each icon file according to which application icon it will be taking the place of (i.e. Name the icon that will be for the Phone application "Phone.png"). Make sure that you name the icon exactly what the application shows up as on your iPhone. If you don't, it will not work correctly. **Now, for the purpose of killing two birds, with one stone, I am going to explain how to use the invisible icon. I used a word dock, so in order to see the words on my word dock, an invisible icon will be placed in front of it. An icon is an icon, whether you can see it, or not. The process of putting them into the theme will be the exact same.** I am only changing the icons that are going to be on my homescreen, but I could customize all of them, if I so choose. That is all that will go in this section and that is the end of your basic theme.
8. It's time to check your work!! I kid you not, I don't know what on earth this theme looks like, because I just threw it together for this tutorial. (LOL) All you have to do is go into Winterboard, find your theme, and respring your device. Once you're done-- if you have done it right-- you will see your wallpaper, dock and icon choices, on your homescreen.
Here's what mine looks like. Remember that there are invisible icons in this theme. It actually isn't bad, considering I just threw it together!!

I hope you all enjoyed this tutorial!! I will be making the invisible icon available to you, in a few, via Shanice's Dropbox. (Gotta send it to her!) If you have any questions, email me or tweet me!!
-Lola
P.S. If you are doing the invisible icon thing, you will also need a few apps from Cydia!!
- No Docked Icon Labels 4.0
- No Wallpaper Shadow
- No Icon Shadow Fixer
Now, you're good to go!!
Thanks Lola :). This is a fantastic tutorial!!
ReplyDeleteLola- Can you email me a transparent icon?? I have been trying to figure out how to do this for a while and am so excited to try it!! JeniferDHart@gmail.com
ReplyDeleteThanks for the helpful tutorial :D
ReplyDelete